H0003 Stabiliser Extension Cylinder - Overhauling Procedure
13 Jul 1998 PDF File
|
Hydraulics
|
Version 1
|
|
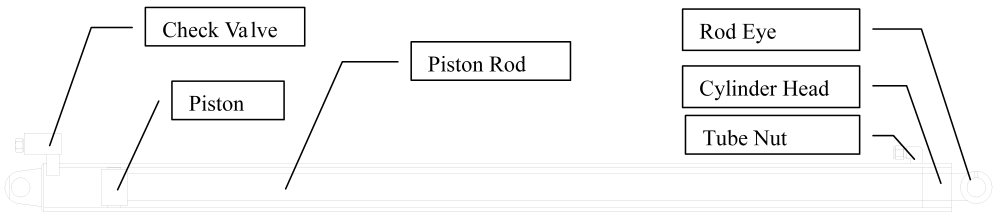
- Fully retract the cylinder prior to removing the hydraulic lines.
- Bleed pressure out of the cylinder by gently cracking open the tube nut at the rod end of the cylinder and then the cap screws which retain the check valve at the base end of the cylinder.
- Remove the pipe work and check valve.
- Grip the cylinder in a sturdy vice, with the jaws no closer than about 200mm from the cylinder head (gripping too close to the cylinder head will distort the tube and could lead to seizure of the head when unscrewing it).
- Ensure that the piston rod is fully retracted before commencing disassembly. If the shaft is even partly extended, the downward loads on the threads can get too high and lead to seizure.
- Rotate the head anti-clockwise (the construction is a conventional right hand thread). The assembly has been tightened to a high torque (530Nm), so considerable torque is required to get the head to start turning. Try to unscrew the head using constant force as opposed to impacting, and endeavour to untorque in such a manner that the forces are upwards (countering the downward force applied by the piston rod)
- To remove the piston rod, grip the rod eye in the vice and untorque the piston. Again considerable force will be needed.
- Replace the seals, paying particular attention to cleanliness.
Reassemble the cylinder in the reverse order of disassembly remembering to apply copious quantities of hydraulic oil during the assembly process.
Piston rod / piston connection must be torqued to 1060Nm minimum.
Cylinder head / tube assembly must be torqued to 530Nm.