E0010 Hetronic Adjustment Procedure
17 Nov 2004 PDF File
|
Version 1
|
Electrics
|
|
- Supply the receiver with power
- Now take the red key (in the following program key called) and insert it instead of the black key into the key switch. Turn the transmitter on.
- Wait approx. 3 sec. until the second buzzing sound has finished. Twist the key one-quarter further (this is only with the program key possible) and press the start/horn button for at least one second.
- Deflect the requested joystick slowly until you hear the vehicles horn (if it is connected up to the receiver - the horn relay will be activated for a brief moment when the joystick reaches a certain value). Keep the joystick in this deflection.
Now you are able to adjust the speed of this function by using "+" or "-" buttons on the side of the remote. Push it towards Ą + Ą to increase the speed, push the switch towards Ą - Ą to decrease it.
Try to adjust this speed as slowly as possible to get a smooth start when you control this function.
Setting the maximum speed.
- Remove the earth wire from the hour meter and connect the voltmeter -ve terminal to it.
- Measure the voltage at the hour meter with the engine running. This should be approximately 13.5Volts on a 12V system.
- Record the voltage. To calculate the Max and Min voltages to set the radio apply the following formula:
Max voltage is set at Ĺ Input V + (3.5V for 12V system) or (6.5V for 24V system).
Min voltage is set at Ĺ Input V - (3.5V for 12V system) or (6.5V for 24V system).
e.g. Input voltage is 14V max and minimum voltage =(Ĺ 14) +3.5 & (Ĺ14V) - 3.5V
= 10.5V & 3.5V
- Move the joystick fully in order to adjust the maximum speed of this function. Proceed in the same way as before by using "+" or "-" buttons on the side of the remote.
- The receiver reacts only on one function during the adjustment. Therefore make sure that only one axis is deflected. After you are finished with this function in one direction proceed in the same way in the other direction and also with all other functions.
- After you are finished with all adjustments wait at least 10 sec. The system writes now the new programmed values in it's memory.
- Switch the hare/tortoise switch in the other position and proceed as described under step 4.
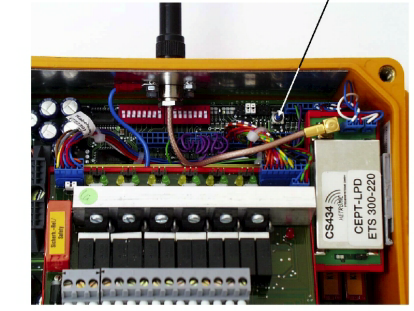
If problems occur during the adjustment, you can always get back to the basic adjustment of the system. Open the receiver lid and press the reset button on the board.

|
Caution! The crane is moving during the adjustment of the functions.
|